Monday, January 16, 2012

Fresh Fettuccine!

We had so much fun this afternoon learning how to make fresh pasta!  All of our past efforts had ended in take-out, but we recently received a hand-crank pasta maker from Matt's grandmom.  Armed with technology and the know-how of our friend Elizabeth, we quickly learned that making pasta was nowhere near as difficult as our previous failures had led us to believe.  :-)

We started by clearing everything off the kitchen table.  Elizabeth measured two and a half cups of all-purpose flour, half a cup of semolina flour, and a bit of salt into a pile on the table, and made a well in the middle.  I cracked three eggs into the well, and mixed it together with one hand while using the other to keep the well-shape more or less intact around the eggy mixture.  When the dough had taken in all the flour that it could, Elizabeth set the ball aside to rest while we cracked one more egg into the well, which had been re-formed from the remaining flour.  By the time it, too, had taken in all the flour that it could, the other ball of dough had rested enough that if you poked it, it bounced back.

Matt clamped the pasta maker onto the table.  Elizabeth took a small handful of dough, patted it down with some of the leftover flour, and ran it through the rollers on the widest setting.  Pat down with flour, fold in thirds width-wise, repeat.  This step continued until the dough felt right - not too soft, but not completely dry and lifeless either.  Then the pasta maker was cranked down a notch, and we ran the dough through it twice.  We ran it through twice on each setting until we came to the narrowest, patting on more flour whenever it felt too soft and sticky.  Before going through the rollers on the narrowest setting, we divided the sheet of dough in half so that the pasta wouldn't be too long.  Then the dough went through two more times, and it was time to cut.

The pasta dough ran through the wide fettuccine blades easily, and Elizabeth caught the pasta as it came out to keep it from sticking and tangling together.  We laid it out to dry on a section of table generously dusted with semolina flour, and began putting the next section of dough through the machine.

In just a little over an hour, we had a lot of pasta.

It turned out really well, and we're excited to use it!  Making our own pasta is also surprisingly economical: in our area, store-bought dry pasta is on a very good sale when 1 lb costs less than $1.50.  In contrast, all-purpose flour runs about 50 cents/lb, semolina about $3/lb, and eggs about $3/dozen.  We figure that we didn't spend more than $2 for our three pounds of pasta, and had a lot more fun making it than we do opening a box!

Saturday, December 31, 2011

5x7 Folded Card

Rough Edge 5x7 folded card
Invitations, announcements and Valentine's Day cards by Shutterfly.
View the entire collection of cards.

Monday, December 5, 2011

Grape skins

Legend has it that a 2nd-century Roman soldier, thirsty from a hard campaign but unable to procure the grapes to make his own wine, fermented a mixture of grape skins, pulp, stems, and seeds.  He called the resulting drink grappa, and the concoction remains a specialty in northern Italy to this day.

We haven't been making any questionable liquor ourselves these days, but I was reminded of this story by a very different drink that we made the other afternoon.  Matt had the day off and I was able to come home early due to icy roads and inclement weather, so we had the chance to make a fun lunch together.  A smoothie sounded like the perfect drink!  The only fruits we had in the refrigerator were red grapes and mandarin oranges... I'd never put grapes in a smoothie before, but it sounded like a fine combination.

After combining the fruit, ice cubes, and some vanilla yogurt in the blender, we remembered why we hadn't been eating these grapes very quickly: they have really thick skins, to the point of leaving a slightly bitter note on your tongue.  Oh well, too late... everything was covered with yogurt by this point!  We blended it together, and gave it a try.

The colors didn't come out so well in this photo, but the smoothie was a lovely pastel orange with bright red-purple flecks (the grape skins).  The sweetness of the mandarin orange juice and vanilla yogurt, combined with the much small pieces of grape skin, eliminated the bitter taste we had been experiencing when eating the grapes by themselves.  The flavors went together very well, too!

Tuesday, November 15, 2011

Quick Comfort Food

There's nothing like getting home a few hours before dinner time, cold and tired, and realizing that you didn't pull out any meat from the freezer to thaw that morning.  You could try to hurry up the thawing process now: leave it under cold running water for an hour or two and hope that it thaws in time to throw in a pan before dinner time, but if you have a slow cooker on hand, there's an easier solution.

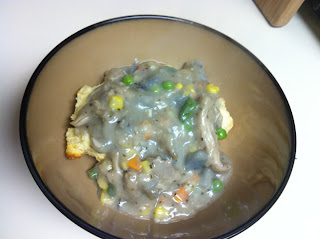
I found myself in just this situation the other day: I got home later than expected, the car hadn't warmed up much higher than the -17 F air outside all the way home, and pretty much all of the food we possessed was rock-solid in the freezer, with the exception of condiments and lunch meat.  I'm not eating processed meats these days, so we weren't even going to contemplate the culinary possibilities of Worcestershire sauce and deli turkey.  Fortunately, the meal I'd been planning for the evening could go in the slow cooker: chicken and biscuits.

Two chicken thighs went directly from the freezer to the slow cooker, set to "High".  If you have one of the newer models with multiple time settings for "High" and Low", this would have been the shortest time setting.  There wasn't going to be too much color in this dinner, so I decided to chop up two purple potatoes and add them to the pot.  I added water and chicken broth until it just covered the frozen thighs, stirred in a healthy amount of marjoram, thyme, sage, basil, savory, and rosemary, put the lid on it, and walked away.

About forty-five minutes before we wanted to eat (that's three hours into the cooking, if you're counting), I made a quick batch of biscuits and threw them in the oven while I checked on the chicken.  It shredded easily with two forks, so it was time to thicken it up a little and add vegetables.  Normally I would have added some carrots, onions, and /or celery along with the potatoes, but we were kind of out of vegetables...  We did have a bag of mixed vegetables in the freezer, though, which warmed up quickly in the chicken broth and added some extra color and nutrients.

To thicken, the only thing I really had was flour.  Next time I think I'll add extra salt and pepper at this stage, because the gravy didn't have as much flavor as I would have liked.  It turned out pretty well overall, though, and what was more important, dinner was on the table on time and it was warm and filling!


If you use regular potatoes instead of purple potatoes, yours won't turn out this funny color :-)

Saturday, November 12, 2011

Sunday morning pie

Because his work schedule changes frequently, there are often weekends that Matt only has Sunday off. It's nice to be able to get up slowly on these Sunday mornings and make a fun brunch before we go to Mass at noon. One of the better recipes for brunch I've found is this quiche--it's quick, easy, tastes great, and since there are only two of us eating it, we have breakfast ready for the next few days!

Cheese and Onion Pie
Pastry for one 9-inch piecrust, well chilled
2 Tbsp butter
1 onion, chopped
1 Tbsp flour
2 c cheese, shredded (I used a combination of Jack and Cheddar)
3 eggs
1 c milk
1/2 tsp salt

Place pastry in pie plate; chill. Preheat oven to 400 degrees.
Melt butter over medium heat. Sauté onion until tender. Spread evenly in piecrust. Chill.
In medium bowl, toss flour with cheese; sprinkle over onion in piecrust.
In same bowl, beat eggs with milk and salt; pour over shredded cheese.
Bake 10 minutes. Turn down oven to 325 degrees, and continue to bake 30 to 35 minutes longer, until a knife inserted in center comes out clean.
Let stand 10 minutes before cutting.


Tuesday, October 25, 2011

Stir Fry Night!


So.

This is Matt. I have never posted on this blog (or any blog, for that matter) before, so bear with me on this one.

My wife has, as you have seen, been posting fun recipes and such, and so when I made a good stir fry for dinner tonight, she said "You should post this on the blog." Of course, I immediately tried to convince her (with much flattery) that she was a MUCH better writer, and that she should put it on the blog. However, I was convinced by the point that if I don't ever post, it won't be our blog. Fair enough. The only problem was that I wasn't using a recipe, and it is pretty simple anyway.

So to preface the "recipe," I feel I should say that stir fries fall into a very specific cooking category in my mind. The category goes by many names, including "mess-of-stuff" (thanks to Luke Hansen) and "leftover velcro" (thanks to Alton Brown), and includes any recipe which you can throw whatever you have in the fridge (within reason) into it, and it will still be good. That being said, on with the recipe!

1/2 Green bell pepper, chopped
1 carrot, julienned
1/3 rack of pork ribs, boneless, cut into pieces
2 eggs, scrambled
a bit of canola oil (technical terms!)
a bit more soy sauce (more technical terms!)
even a bit more teriyaki sauce (tired of this yet?)
1 tsp dried onion flakes
1 tsp dried grated ginger

So it started with a nice hot wok with the canola oil in it. To that, I added the main ingredients in order from longest cooking time to shortest. That order was pork, carrots, pepper (with onion flakes and ginger), eggs. I vigilantly stirred the whole mixture as it cooked to make sure it didn't burn (much), and then added soy sauce and teriyaki toward the end. After letting the flavors come together a bit, it was finished and removed from the heat. We served it over white rice.


So there it is! Hope you enjoyed!

Sunday, October 23, 2011

Explosive Apple Cinnamon Bread

Most mornings during the work week we don't really have time to sit down and eat breakfast, so we wind up eating a slice or two of bread as we run out the door.  We go through one loaf of a breakfast bread in a little over a week, so every weekend or so I throw together another loaf.  For the past several weeks we've been enjoying banana bread with peanut butter, but this week we were out of bananas, so we decided to come up with something more creative.

I've found that you can have a lot of flexibility with ingredients in quick breads and muffins as long as you keep a balance between the basic categories (fats, sweetener, additions, etc).  This is really helpful, because I'm kind of known for running out of key ingredients and making weird substitutions.  My experiments usually turn out okay, but they work a lot better when I have a flexible recipe in the first place!  Here is my basic quick bread/muffin recipe:


2 - 2.5 c flour (today I used all purpose flour with flax)
0.5 c sweetener (today I used brown sugar)
2 tsp baking powder
1 c milk
0.25 c fat (today I used oil)
1 egg
up to 1.5 c additions (today I used chopped apples)
spices, optional (today I used 2 T cinnamon)

For muffins, bake at 400 F for 15-20 minutes.  For bread, bake at 400 F for about an hour.  Makes one loaf or 12 muffins.


We're not entirely sure why it wound up like this; it appears that the top crust formed quickly in the baking process, and later on when steam built up inside, it couldn't force its way through the top and wound up erupting out the side of the loaf.  I may try baking it at 350 F or 375 F next time, to see if that helps.